Filling Fields
In the previous section it was shown how expressions from the configuration file could contain independent, read only parameters and which could be evaluated at a later point, after the configuration file has been processed. This can be used to evaluate the same expression for any number of different values of the independent parameters. A useful and common application for this feature is to fill numerical grids with position dependent values using an expression that contains the space coordinates x, y, and z depending, of course, on the dimensionality of the simulation. Because this is a common use case, Schnek provides a mechanism for filling numerical grids. To make use of this function, one needs to define a Field object. The Field class extends the Grid class with information about the physical dimensions of the numerical grid and the grid stagger. More information about the Field class can be found here.
In the following example a Field will be initialised from a configuration file. This includes defining the number of grid points on the grid as well as the physical dimensions of the domain that the grid represents.
class SimulationBlock : public Block
{
private:
Array<schnek::pParameter, 2> x_parameters;
Array<int, 2> N;
Array<double, 2> L;
Array<double, 2> x;
double fieldInit;
pParameter paramField;
pParametersGroup spaceVars;
protected:
void initParameters(BlockParameters ¶meters)
{
parameters.addArrayParameter("N", N);
parameters.addArrayParameter("L", L);
x_parameters = parameters.addArrayParameter("", x, BlockParameters::readonly);
paramField = parameters.addParameter("F", &fieldInit, 0.0);
spaceVars = pParametersGroup(new ParametersGroup());
spaceVars->addArray(x_parameters);
}
};
The array N will be used to define the number of grid points. By using addArrayParameter() to register the two dimensional array, the setup file will recognise the parameters Nx and Ny. Similarly, the array L represents the physical dimensions of the grid. The setup file is instructed to recognise the parameters Lx and Ly.
In order to register the space coordinates to be used in expressions in the configuration file the array x is registered with the BlockParameters::readonly flag. Note that the name of the array is an empty string. This means that the full names in the configuration file will simply be x and y. The return value of the addArrayParameter call is stored in an array of Parameter objects, called x_parameters. These parameters are stored in a ParametersGroup called spaceVars. This parameter group will later be needed to set up the independent parameters when evaluating the expressions in the configuration file.
Finally, a helper variable is needed which will take the place of the field that should be filled. In the example above this helper variable is called fieldInit and the name in the configuration file is simple F. The Parameter object that is generated is stored in the paramField variable.
In a separate method which will be called after initialisation a Field is created and filled with values.
  void fillValues()
  {
    // create Field
    Range<double, 2> range(Array<double, 2>(0,0), L);

    Array<bool,2> stagger(false, true);
    Field<double, 2> dataField(N, range, stagger, 1);

    // set up dependency map and updater
    pBlockVariables blockVars = getVariables();
    pDependencyMap depMap(new DependencyMap(blockVars));

    DependencyUpdater updater(depMap);
    updater.addIndependentArray(x_parameters);

    // fill field with values
    fill_field(dataField, x, fieldInit, updater, paramField);
  }
The first three lines of code in the fillValues method simply set up a field called dataField. See here for more information about Fields. Note that we are using the L and N arrays to specify the physical and numerical dimensions of the grid.
The next block of code sets up the dependency map and the updater. This follows exactly the same pattern as explained in the section about evaluating expressions. Note however that no dependent variables are added to the updater. The independent variables are added in the form of an array using addIndependentArray.
The last line of code calls a utility function called fill_field. This function takes the Field object that should be filled, the independent variable array x, the dependent helper variable fieldInit, the updater that was just created, and the parameter paramField that was generated when registering the helper variable. After a call to fill_field, dataField will be filled with values calculated from the expression in the configuration file.
A simple double loop can write out the values of dataField.
    for (int i=0; i<=N[0]; ++i)
    {
      for (int j=0; j<=N[1]; ++j)
      {
        double px = dataField.indexToPosition(0,i);
        double py = dataField.indexToPosition(1,j);
        std::cout << px << " " << py  << " " << dataField(i,j) << std::endl;
      }
      std::cout << std::endl;
    }
Note here that indexToPosition is used to calculate the physical coordinates from the grid indices.
Now we are ready to write out configuration file.
Nx = 50;
Ny = 50;
Lx = 20;
Ly = 20;

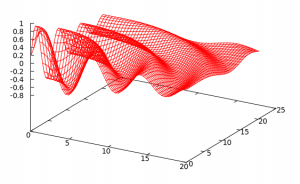
float radius = sqrt(x^2 + y^2);
float decay = exp(-radius/10);
F = decay*sin(radius);
 The numbers
 Nx and Ny define the number of grid points, Lx and Ly specify the physical extent of the simulation domain. Two helper variables are defined radius and decay. The value of radius depends on x and y. These are the read-only independent variables that specify the position of the grid points. decay indirectly depends on x and y through radius. Finally the field variable F is specified using radius and decay.
The dependency updater will resolve the dependency of F on the position variables x and y. The fill_field function will iterate over all grid points of the field and set the value according to the formula specified in the configuration file. The resulting field data is shown on the right.
The code for this example can be found here and the setup file is located here.